
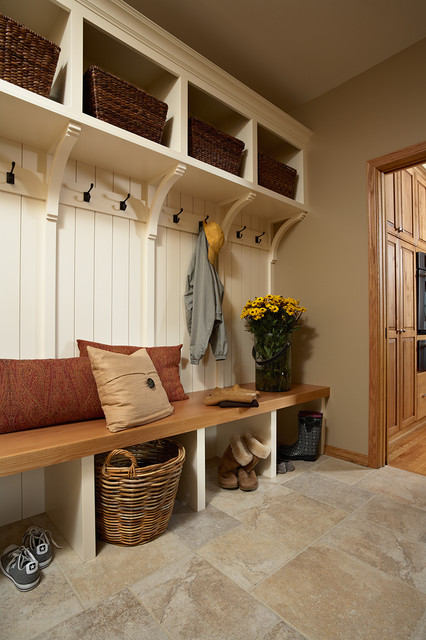
Skill level: Intermediate Tool List: Miter saw (optional) Circular saw Pocket hole jig Drill Driver (optional) Belt clamp (optional) Router with chamfer bit (optional) 1/4"x 6" drill bit 16 gauge nail gun (optional) Ratchet with hex head Inspiration:
Step 1: Determine your layout
My mudroom bench layout revolves around the bead board I installed on the wall. I bought 4 packs of it at Lowe’s and the length of my bench corresponds to the bead board width plus a small trim piece as seen in the picture below. I wanted the bead board to show between my bench cubbies, which presents more work as I will discuss in the installation section. I recommend reading the whole blog first which will provide different options for simplifying or reducing cost on this project.
My bench will be roughly 7′ or 86 1/4″ exactly. I wanted 4 cubbies. Each leg of the bench is 2.5″ wide and 4 cubbies would require 5 legs. Therefore, each cubby would be( 86.25″ – 5*2.5″)/4~ 18″ which is a good cubby width for my family. As I mentioned above, the bead board for me is the star, so when I align my legs, I have to do it according to the beads. If you didn’t care about the bead board, your best bet would be aligning your legs with your wall studs so you have a way to anchor the bench to the wall. Otherwise, I will discuss some alternative installation mechanisms later on.
Next, determine your preferred bench height. I used 18″ but others prefer 16″. If you use 16″, you will want to subtract 2″ from the leg height (see below).
Determine your bench depth. I found some 2×6 pieces of oak that I wanted to use, so my bench top depth will be 22″ (using 4 pieces and remember, a 2×6 is really only 5.5″ wide). The overhang for the top of the bench with respect to the legs looks good at 1.5″. That means the overall leg depth is 20.5″. However, since we are using 2×4’s and plywood, a trim piece (1×3) will be added to the front of each leg. A 1×3 is really 0.75 x 2.5″so each leg will actually be 19.75″ deep. Read the installation section before finalizing your depth, because if you don’t want to add bracing within your walls (as I am doing) and you didn’t align your legs with the studs, you will need to add a backboard to your bench which will decrease the leg depth.


Step 2: Determine what supplies you will need
Buy List:
6 – 2x4x8’s (4 for legs, 2 for wall bracing)
4 – 2x6x8 boards (I used oak from Menards)
1 – Sheet of hardwood plywood
1 – 1x3x8 board for trim piece
16 gauge 1″ nails
16 gauge 1.25″ nails
2.5″ pocket screws
Construction adhesive
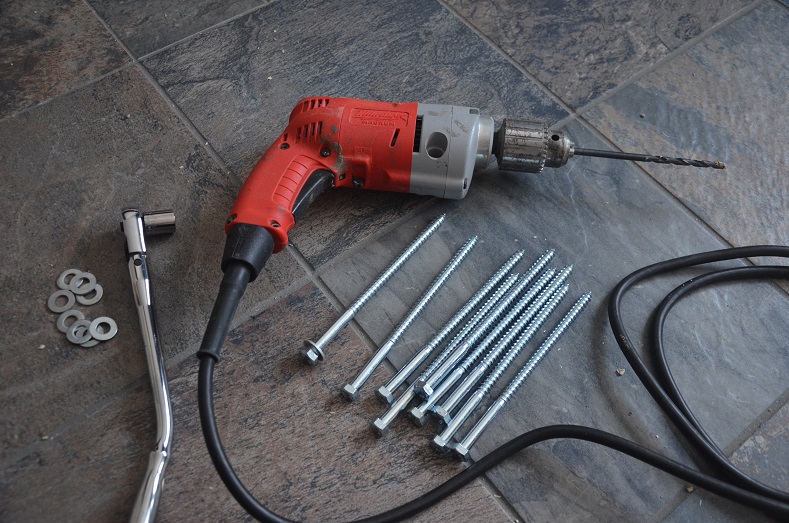
10 – 3/8″ x 6″ hex head screws
10 – washers for 3/8″ hex screws
Cut List:
10 – 13″ L 2×4 (11″ if making a 16″ tall bench)
5 – 12 3/4″ L 2×4
5 – 19 3/4″ L 2×4
10 – 19 3/4″ x 16 1/2″(14 1/2″ if using 16″ tall bench) 1/2″ plywood providing your floor is a perfect 90° with your wall. Mine is not, so I will demonstrate how to cut the plywood when you have a slanted floor later on.
* I never cut all my pieces at once in case I mess something up. For this project, I assembled 1 leg prior to making the cuts for the other 4 legs.
Step 3: The fun part
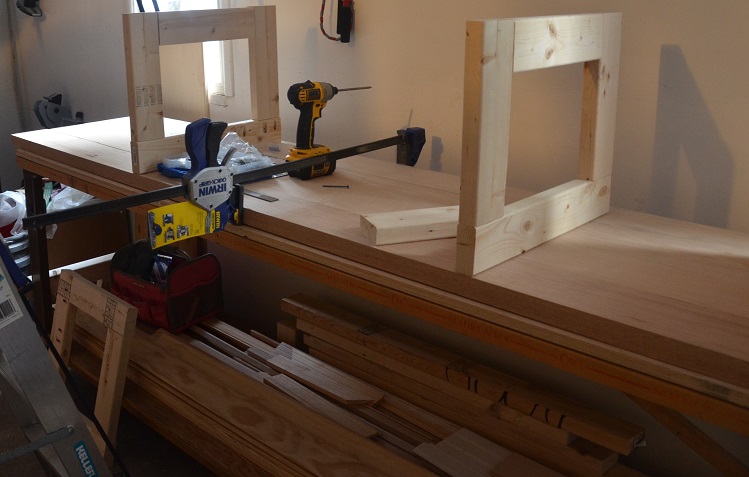
1. Assemble the legs
After you cut the 4 pieces for the legs, assemble them with pocket screws as shown below. I used a miter saw to make the cuts, but you could use a circular saw. I used a belt clamp to hold the pieces square while I drove in the pockets screws. However, I am sure you can find a unique way to hold them square without a belt clamp.


2. Prepare bench top boards
There are a few things you will want to do prior to attaching the bench top boards to the legs.
The first is to be sure your wall is flat. I say this because my house was built in the 50’s and our one wall opposite where the bench will be installed is extremely bowed as depicted in the photo below. If your wall is not flat, you will want to scribe the board closest to the wall. You can look up the scribing technique on YouTube or search for references to “scribing” and “This Old House”. Luckily, the wall I am using is flat-enough.

The second is to pick the order and placement of your boards. I put my nicest boards in front and the nicest side facing up. I also marked the order of the boards which came in handy a few times.
The third is to mark all the sides of the boards that will be chamfered. When you buy stock boards, no two are identical. Therefore without a planar and jointer, there is no way to get your boards to be perfectly flush when they are butted up against each other. I solved this problem by using a chamfer bit (22.5°) on my router to remove the edge so you won’t see any unevenness as shown below. I also like the detail of the chamfer. I marked the 6 edges that butt each other. The front and back edges I left square. You could also use a plywood bench top which would eliminate this issue and would provide a more economical bench-top solution. You can message me if you are interested in the plywood bench-top approach. You could also buy a hand electric planar for around 60$ which would probably even out the seams.

The forth is to cut a clean edge on the wall-side of all 4 boards. The ends of my boards were a little beat up and since I am only using < 7.5′, I could afford to make a nice clean edge.
3. Dry fit the bench
I wanted to make sure there weren’t any surprises after assembly, so I dry fit the legs and the bench top. Using shims, level your bench legs in all 3 dimensions. Then place your boards on top and verify they are level. At this point, I marked the bottom of the boards with the leg location. If you are using exact measurements, this probably isn’t necessary, but as I mentioned, I wanted the legs to align with the beads. So my two outer cubbies are slightly smaller than my two inner cubbies.


4. Assembly
I started by marking where the boards would sit (5.5″ increments) on the top of the legs so I knew where to put my pocket holes that will anchor the legs to the bench top. I made the holes as depicted below. A word of caution, since we already have pocket screws on the left and right sides, If you don’t put the new holes on the same side as the others, you may drill into a screw (as I did on a leg NOT shown). If I were to do it again, I think I’d put the 4 center holes on the opposite side to possibly give more support. But the way depicted below worked just fine.

Using a flat work table, I clamped the boards together upside down, squared the legs to the boards, clamped/leveled the legs to the boards as good as possible and screwed all 40 pocket screws.

At this point, your legs are not very sturdy. This is expected and the legs will be fine once we attach them to the wall. But for now, I added some temporary support to the front as I have a few things left to do prior to installation.

5. Finishing the bench top
The left side was never cut to length as I wanted to wait until the piece was assembled so I could guarantee a straight edge. I measured over 2″ from my leg (1/2″ for width of plywood and 1.5″ overhang) and using a square, I drew my line.

I taped my line and then re-drew it on the tape. The tape prevents the wood from tearing-out, and the last thing you want when you are this invested is to ruin your boards (oak is awful at tearing-out). I made a second line to the right of the tape where the guide of my circular saw will be if the blade is just to the left of the line on the tape. Since every saw is different, you will have to measure yours. I then clamped a scrap piece of wood to the boards to use as a guide and made my cut. Warning, I never noticed there is a depth adjustment on my saw because apparently everything I ever needed to cut was less than 1.5″. So the first pass, I only cut through half-way. I then used the correct depth for the second pass but the edge was funky so I needed to get out my orbital sander to make it nice. So use the correct depth the first time.


I took this opportunity to stain the bench top with a gel stain in “Java”. I highly recommend the gel stain for oak. I just stained some oak picture frames with regular oil-based stain a month ago and the oak refuses to darken. With the gel, it is automatic! I did use 2 coats, but I love how dark it is, AND I can still see the grain! I also layered 3 coats of oil-based poly.
6. Installation
a.) My Installation
Let me start by stating that my whole bench design, besides being inspired by the photo at the top, relies on opening the wall behind the bench. I am going to install some outlets (rather my husband is) within the shelving above (look for it in an upcoming blog!) so I knew I needed to open the garage-side wall already. Having said that, there are a few different modifications you can make to the bench as alluded to above. I will describe my installation and then go into the mods you can make that don’t require opening the wall.
The first thing I did was place the bench on the wall, re-shimmed, and drilled 2 holes per leg using a 1/4″x6″ long drill bit. My drill is quit large, so I actually started with a 4″ bit, then shoved the 6″ bit in the hole and re-attached the drill. When you decide on your hole placement, make sure the top hole doesn’t interfere with your pocket hole screws. After all holes were drilled, I took this opportunity to paint the bead board so it wouldn’t be so difficult later.

Then I tore into the garage wall!! I added bracing where the pre-drilled holes were located using 2×4’s and just a couple of screws toed-in (nothing fancy like pocket holes).

By this time, my bead board was dry, so I placed the bench in its final position and took my time to make sure everything was shimmed/leveled for the final time. Then came the arduous task of screwing in the 3/8″ x 7″ long screws. I was planning on using bolts/nuts which is why I decided on 7″ long. Lowe’s only had 4 bolts. But they did have enough screws so I changed my mind (being lazy and not wanting to go to another store) and bought the 3/8″ x 7″ screws. Unfortunately, since the game-plan changed, I no longer needed the extra screw length as I no longer needed to attach a nut. So long story short, 6″ screws would be plenty!!! So for the next couple hours and ALL my arm/back strength, I screwed the bench to the wall (remember to put the washer on first!) and removed the temporary bracing.


b.) Alternative Installation
If you don’t want to bust into the back of your wall to add bracing, you can do a few different things. 1.) If you don’t care about bead board, just attach a 1/2″ sheet of plywood to the back of the bench legs and into the bench top. You can then attach the bench to the wall by screwing the plywood to the studs. For this design, make sure you adjust the length of your 2×4’s and plywood to reflect the decreased depth. 2.) You can also attach a strip of plywood to the top and bottom as indicated in another blog I found http://www.infarrantlycreative.net/how-to-build-a-mudroom-bench-lockers/. 3.) Lastly, just align the legs with the studs, probably about 16″ for normal studs, then do exactly what I did to attach the bench to the wall.
7. Time to Trim
Trimming is my favorite part, I don’t know why. But it also takes patience. I started with cutting/gluing my shims to the bottom of the legs. Then I cut the plywood for the sides of each leg. If you didn’t have to shim your bench, you can probably just cut the plywood as indicated in the cut list above. However, I had to measure every side of every leg. All I did was measure the height from the floor to the under-side of the bench in the back (closest to the wall) and in the front. My back measurement was 16.5″ exactly. My front was 16.75″ish. The depth was 19.75″ as expected. Now I needed to transfer the measurements to my plywood.
Since I don’t have a truck, I had Lowe’s rip my plywood in half along its length. I will get 5 leg sides out of each half. First I marked a line 19.75″. Then I marked 16.5″ on the one side and 16.75″ along the line I made. I connected the points and made the cut. Then I made the cut along the 19.75″ line. A few tips. 1.) Put the side of the plywood you intend to face out, down on your table. The circular saw chips whatever side is up to a larger extent. 2.) Between cuts, make sure you get the plywood back to a right angle. If you make a cut as I describe above, then the next leg will require you to square up the plywood before repeating this process 9 more times! 3.) Make sure the blade of your saw is on the correct side of your cut line or else your piece will be short by the width of the blade!

After my plywood was cut, I cut the 1×3 to length using the measured height of the front of each leg. I then glued the plywood using construction adhesive and nailed it to the 2×4’s using 16 gauge 1″ nails. The front trim piece was also glued and nailed in with 16 gauge 1.25″ nails. Make sure you choose your nail placement wisely. There are alot of pocket screws and installation screws you don’t want to hit!
Also, make sure you dry fit everything prior to gluing/nailing. If for some reason your plywood is shorter than the 2×4 (see below), route out a groove (I used a big mortising bit, took 20 minutes) in the middle of the board to fix.


I added my baseboards (optional of course) and my bench is all trimmed-out!


8. Finishing
Ugh… Can you tell finishing just isn’t my strong suit? So when I selected my wood for my legs, I did so always envisioning that I would paint the legs white. Well since it is winter, I am reminded of how dirty boots can be. I adjusted my plan to stain the legs since my wood is technically stainable. So I taped, stained (2 coats) and…

Okay, you can’t really tell from this photo, but it is awful! The red oak top has a warmer red-brown color than the legs. In order to cover my nail holes, I had to basically stain them black (really dark brown). So I had 3 problems, 1.) Making the legs lighter. 2.) Making the legs more red and 3.) Covering the nail holes. Well I accomplished 1 & 2 by sanding a bit then applying a cherry gel stain. The color was good but I could still see the nail holes and my sanding marks! So I either basically sand down the entire leg, remove the wood putty and start over, or….I do what I planned in the first place and paint them. I decided on the latter.
My advice if you want to stain your legs is, 1.) Use the same species of wood for your entire project, i.e. bench top, leg plywood, leg trim piece. 2.) A bunch of tutorials online recommend staining prior to filling holes. Then fill them with a tinted stain that matches exactly. I have not tried this so let me know if you do and it works! OR attach trim in such a way you don’t have nail holes. I know I will plan my next project that I intend to stain such that I don’t have a lot of holes to fill!!
After some caulk, primer and enamel paint (Sherwin Williams of course)…

I hope you enjoyed following my progress. I can’t believe how great it looks!!

Great instructions! I can’t wait to see the finished product.
LikeLiked by 1 person
Nice blog! I’ll be tuning in….
LikeLike
This is so awesome! Good job!!
LikeLike
This is so inspiring!!! You’re crazy talented ((:
LikeLike
Can’t wait to come and visit and see the finished project.
LikeLiked by 1 person
Most impressive. A tour-de-force of sequential logic and practical application.
LikeLiked by 1 person
Making great progress! I like how Charlie worked his way into the shot 🐾
LikeLike
I like the white legs better 😄 looking great
LikeLike
I have noticed you don’t monetize your site, don’t
waste your traffic, you can earn extra bucks every month because you’ve got high quality content.
If you want to know how to make extra money, search for:
Mertiso’s tips best adsense alternative
LikeLike
Thanks for the tip!
LikeLike