
During the last few weeks, I’ve become inspired to try some Christmas Pinterest projects before moving onto my husband’s closet built-ins. Some of the photos are at the bottom of the blog. However, I wanted to create a mini-tutorial on how to build The North Pole because I think everyone should have one!!
I started with a design from Corey Decker that I just love! It is so classy and beautiful, not to mention fun. I decided on a different base design because I wanted the pole to be suitable for the outdoors. Also, I wasn’t sure how the plywood would hold up in the long run and how stable the post would be. So here is everything you need for my version of The North Pole!
Time Commitment:
- 4-5 hours hands on
- 1-2 week hands off
Tools Required:
- Drill
- Nailgun or hammer
- Screwdriver
- Caulk Gun
Materials List:
- 4 – 6” x 8” or similar corbels. I got mine from the Home Depot for 2.50$/corbel. (Note: They are in the “make your own table” section and not with the other corbels! Also, the selection is pretty terrible and some are in bad shape so you will need to check them all out!!). They all need a great deal of sanding!!
- 1 – Newel post. Mine is 56” from the Home Depot at 38$. An alternative is a 4 x 4 with a cool deck post cap for around 22$ or a treated turned deck post for $12. However, you will need to let the pressure treated wood dry out for at least a year before painting. So if you want to do this next year, buy the 12$ turned deck post from Lowe’s right now!!
- 1 – 15” Black plant hanger. I got mine from Menards for just under 6$.
- 1 – Amazing sign. The blog I linked above had a pdf you can use to paint your own sign. My hands are not great in the steady painting department, so I enlisted the help of Peter to create for me a similar sign out of aluminum which is also light and will weather nicely. Sign was 13$ plus 10$ shipping.
- Caulk – If your pole will be indoors, just get the siliconized acrylic laytex caulk (NOT Silicone!). For the outdoors, I use Quad caulk, but check the curing time prior to painting! Either way, make sure the caulk says “Paintable”!
- Construction Adhesive – I use Gorilla as it has a quick initial tack.
- Nails/screws for the legs.
- Sand Paper
- Wood Putty
- Zinnser Seal Coat (18$)
- Rustoleum primer and Colonial Red Gloss spray paint. 4$ each. Update: The Rustoleum primer didn’t do a great job. I had a lot of re-work to do. For a different pole I used a Krylon Bonding primer and it did much better! I also used 2 cans of red!
- Hooks for Stockings (Optional) at 2$ each.
Total: About 89+$ depending on if you have the “essentials” like the sand paper, nails and putty, etc. I tend to not count those in estimates because I forget 🤦🏻♀️
Let’s get started!
Step 1:
Sand pole. This was easy for me as I have the 38$ pole. But a deck pole may require more work.
Step 2:
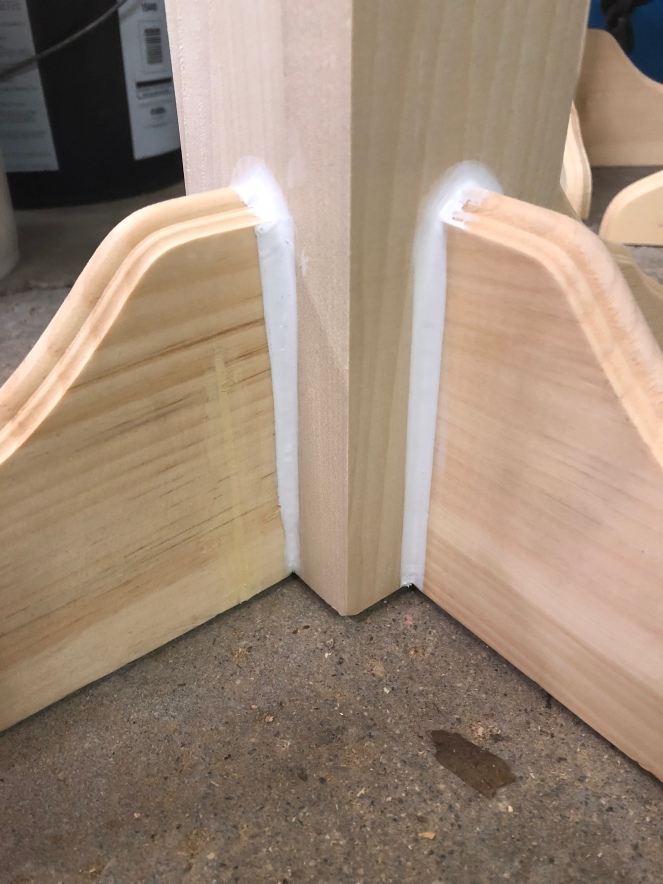
Attach corbel “feet”. Each corbel has a keyhole hook so I pre-drilled a hole and put a screw in each leg where I wanted the final placement of the foot to be. I used construction adhesive on the top and toe-nailed the top into place. (The hardest part of the entire project is getting the feet to be all level! If your pole teeters a bit, just glue some shims to the bottom of the feet 👍)

Step 3:
Countersink nails, fill holes with wood putty and caulk around corbels.
Step 4:
Wait the required amount of time for caulk to cure.
Step 5:
Sand wood putty.
Step 6:
I use Zinsser Seal Coat first. Anytime I paint with water-based paint, this will always be my first step. I once had a bad experience where I just primed and painted, and there must have been a residue on the wood that the paint would not stick to! So I always use this first! Then a light sanding before the next step!
Step 7:
Prime and wait. DON’T SKIP THIS STEP!! By the way, if you are using spray paint, I recommend this gizmo…saves on the sore finger and helps you to get a more even spray pattern by letting your hand be in a better position.

Step 8:
After you primed the pole, you will notice that the wood grain has raised and now feels rough.
 A good sanding with a higher grit sandpaper or foam block will knock down the raised grain. (DON’T SKIP THE PRIMING STEP or else the raised grain will be part of your final coat!). The more care you take in sanding, the better your pole will look! If you can feel roughness or see grain, the glossy paint will definitely accentuate it!! After sanding, you can paint! Depending on the temperature and humidity, you may have to leave your pole undisturbed for a few days or else you will certainly leave your fingerprints in the glossy paint!

Step 9:
Install the plant hanger and sign.

Step 10 (Optional):
Attach hooks for stockings.

DONE!
So as you can see, it’s not that hard to make, but plan for a lot of sanding time and time in between each step to get the best results!

I soooooooooooo LOVE, LOVE, LOVE it !!!!!!!!! Such a great idea!!!!!!
LikeLike