
This is a tutorial on how to make a bench from an old headboard and footboard. Many of the concepts, tools and finishes are the same as my Mudroom Bench tutorial. However, checkout my review of Milk Paint at the bottom of the page!
First you will need a cool headboard and footboard. There are 3 bench styles I plan on doing eventually. 1.) Using the footboard parallel to the headboard, 2.) Cutting the footboard in half and using it as the sides, and 3.) Using no footboard. This tutorial addresses #1.
I like a bench seat to be about 18″ high, so the first step was to cut the footboard. I actually put it up on my work bench and just cut it with my miter saw. But even a hack-saw would do as the cut will not be visible (see the picture below).
Now because the footboard is essentially the same width as the headboard, I debated between the following joinery options for my apron. 1.) Pocket Hole joinery, 2.) Mortise and Tenon joinery, and 3.) Screwing apron directly to outside of legs. Don’t get me wrong, I love pocket holes and I love my Kreg Jig, but I try to never make the sole structure of a piece rely on pocket holes. So I decided against option 1. Option 2 is probably ideal for a piece of furniture. My biggest issue is I haven’t done many and I was afraid of ruining my headboard or footboard in the process. It’s not like I can just scrap it and start over as with a regular board. So while I enjoy the challenge, I opted to be a little more conservative this time and chose Option 3. I directly screwed my apron to the legs and used putty to cover the holes since I knew this piece would be painted later (I never use putty if I plan on staining, I use colored crayons that match stained wood…see below where I discuss crayons).
Next, I attached bench seat supports to the apron using pocket holes created by my Kreg K5 jig.

This is what it looks like at this point.
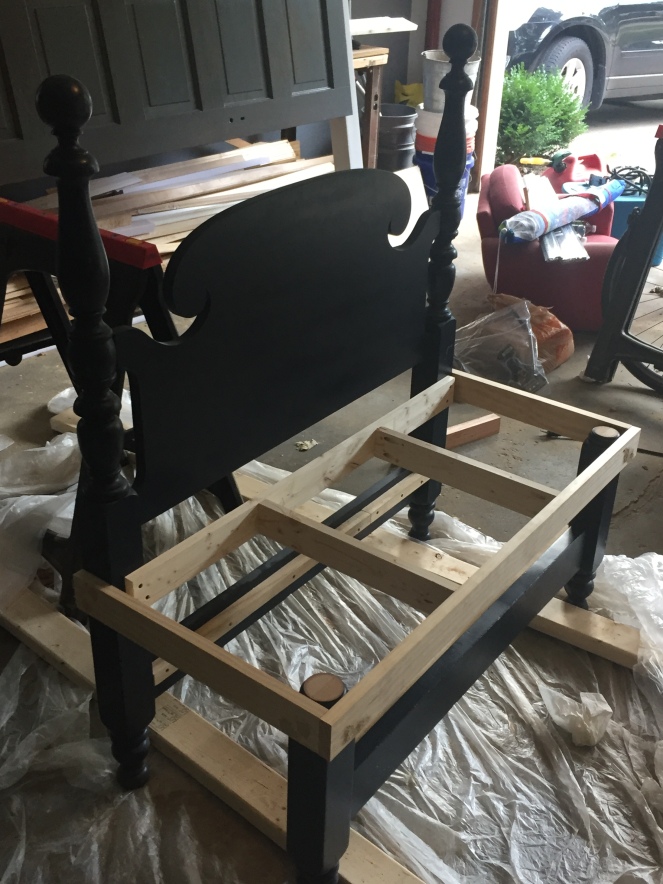
I made a design decision since I am a mother who lives in Michigan and has now 3 kids with gloves, balaclavas, and sunglasses. I chose to put a shelf underneath for some baskets. I actually like to go to the store with approximate dimensions in mind and buy the baskets before I build anything. So with baskets in hand, I placed a cleat along the inside of the headboard and footboard using a couple leftover 2x2s (See picture above).
Everything you see in that picture above is going to be painted, so I puttied the holes and sanded until my heart’s content.
The bench seat is going to be essentially the same as my mudroom bench, except I am using 1×4 pine instead of 2×6 oak. Mainly because the oak would drive the cost of the bench up so high it wouldn’t be practical. Plus, I did my basement shelves with a common pine grade 2×12 and it is just beautiful after I stained and poly’d them. So I used common pine for the bench top and the shelf slats. I used select pine for the apron which is much smoother since I knew it would be painted. Many people would probably say that is backwards but I hate knots when they are painted but I think they are beautiful stained. Anyways, after cutting all the boards, I chamfered the inside edge of the bench seat boards for the same reason I chamfered my own oak boards…I don’t have a planar. If you butt two boards together and they haven’t been planed/jointed, it will look…ugh, ridiculous! So by spending 30 extra minutes at the lumber yard (with your 5 month old), your boards will be straight enough. If you chamfer the edges, no one can tell the boards are not the same thickness. So both problems solved!
Finishing…oh yes, the step that both makes and breaks your project! I am going to gloss over what I did and what I used but checkout my detailed review of some products at the end of this page to see what worked…and what didn’t!
The staining was easy. I went to my trusted General Finishes gel stain in Java. I used Miniwax wipe on Poly to finish the boards. Turns out beautiful every time!! I just did 1 coat of stain, using a lint-free cloth to apply. Make sure you do the underside of the board…this will seal the grain. If you only seal one side, your boards will want to warp later. I used 3 coats of wipe-on poly, sanding minimally with like 320 grit between coats just to take away any high spots. I finished the boards BEFORE attaching them to the bench this time…so much easier than doing it attached as I did for my mudroom bench!!
Painting… ugh painting. So I typically don’t paint anything. I always stain wood. However, the headboard was already painted and I felt it would look really outdated if the entire piece was stained so I did not go through the effort of stripping the headboard and footboard. Where do I start? Well I love the Sherwin Williams Pronamel. So why didn’t I use that? Good question. In the midst of deciding on what paint to use, I came across multiple blogs about milk paint. I couldn’t really tell what all the fuss was about just that people typically use it when they want to distress furniture. You are also supposed to be able to apply without sanding or priming first. The reviews were that it goes on so smoothe and has a velvety texture. Okay, that sounds fun, let’s do that!! I chose to use General Finishes Milk Paint in Seagull Grey. I also chose to use my Fuji Semi-Pro sprayer to apply the milk paint. See below for my experience with milk paint.
After the bench was painted and the boards were stained, I used my Brad nailer (18ga) to attach the shelf slats to the cleat. For the bench seat, I went with a finishing screw. I first lined up the boards, then drew lines on the underside of the boards where the support boards are located. I removed the seat boards and pre-drilled the holes between my lines so that I knew I would hit the support boards. After everything was screwed in, I used these Crayons to fill in the holes. You just rub them into the hole using some pressure until you can’t see the hole anymore. Then take a cloth and buff away the excess wax. Super easy and I like how you can choose different colors based on where your hole is. I do wish there was a lighter brown color but this pack is nice and will last a really long time.
I also made a coat rack out of an old board. I routed a detail on the top and bottom. I bought the Freud keyhole bit to make keyholes for hanging. And here is the finished product! Now go make your own!!


Beginning of my Milk Paint Review
Let me just say, the sprayed-on milk paint turned out just beautiful. The paint was everything everyone said it was… flat but still had depth, velvety, and the sprayer with the 1.5mm aircap worked liked a charm. Now you ask, what is the problem then if it turned out so beautiful? Well milk paint should be protected… even the General Finishes website suggests that you protect milk paint as smudges are hard to clean. Okay, so what to choose. Well many people use wax over milk paint, either clear or antiquing. I didn’t want this piece to look old. I like to make old pieces look new and I like to make new things, but I typically don’t like to make new things look old. That isn’t my thing… well as of right now anyways. Other people say that although wax is beautiful, it isn’t practical as it needs to be reapplied and it just doesn’t hold up under the wear and tear of everyday living. So as a mother… who is making a bench with 3 baskets for the children who will eventually use this bench… wax is out. Okay so polyurethane… ugh. Well I never use water-based poly because the only thing I poly is stained wood and the only stain I use is GF gel stain (oil-based). It does appear you can use oil-based over the milk paint if you let it dry thoroughly, but oil-based poly tends to yellow the color. Being that my bench is a very light grey and I LOVE the color, I did NOT want to yellow it. So I bought some Polycrylic. Now, I did test a section of the bench…I am not that dumb, but the section I tested did not react like the rest of the bench. BTW, spraying was a one-time deal. Being a mom of young ones, it is too cumbersome to prep, spray, and then clean the gun all the time. So I decided to brush on the poly on the flat portions and wipe it on the curvy parts. This worked pretty well, but I think if this were a perfect world, I would definitely spray the poly when I took the time to spray the paint. But anyways, back to my color issue. On all the new wood, the color is fine. On the headboard/foot board, in some areas, it turned almost like a reddish hue. Yes, I know. Not ideal. I am guessing the wood is mahogany as people say the red can bleed through. Surprised it only did this after I applied the poly though!! The color, however, kind of looked like I used a glaze and antiqued portions of it, which I didn’t mind. The only spot I didn’t like was main part of the headboard. At this point, I was not about to get my sprayer out again… oh no. So I brushed on the milk paint one additional coat onto the headboard. Wow… it says that it is self-leveling, but it is not like SW Pronamel which is also self-leveling. So now I have no brush marks anywhere but the main piece of the bench… awesome!! I thought my only choice was going to be to sand it down and spray it. So as I was sanding it down, I noticed Milk Paints true advantage… it is made for sanding!! I mentioned before that people use it to distress furniture, but I never realized why. When you sand milk paint, it gets super super duper smoothe. And if you do it gently enough, it doesn’t show the layers underneath. So I sanded out all my brush strokes!! I couldn’t believe it. So I was back to a perfectly grey smoothe headboard. I did brush on poly once more and it did give me some of the red tones again but it looked so much better than the first time. After buffing the poly a bit, I called this one good. So my conclusion to milk paint is this… either leave it in all its glory, knowing that it is going to mark up and scuff up or use it when you want to distress something as it is super easy to sand. If you don’t want brush marks and don’t have a sprayer but don’t want to distress the piece, I think I would go with SW Pronamel. No protective coating necessary! Also, full disclosure, GF makes a product called Flat out Flat specifically for their milk paint. I think I will try that on my next milk paint project, but maybe do a test board first!! I plan on doing another bench with an amazing headboard using SW Pronamel now. However, I have a great idea for a hall tree that I think sprayed on milk paint will be amazing. Stay-Tuned and I will update my review when I use the Milk Paint on another project!!
